
Ever thought about cutting your own hair at home instead of going to the salon? For those brave enough to try, how to cut your hair is becoming a popular skill. With the right self-hair trim guide, many find it easier than expected to trim their hair by themselves. But is it as easy as it seems?
Today, taking control of our hair care is not just a choice but often necessary. Whether you want a new look or fix split ends quickly, learning to trim your hair at home is becoming more common.
This guide to DIY hair trimming will give you key insights into the ease and benefits of styling your hair yourself. If you’re thinking about keeping a neat pixie cut or cutting curly or textured hair, this is where your journey starts. Can you get that salon look by yourself, or are there hidden dangers? Let’s explore this together.
Recently, the importance of a good self-hair trim guide has become clear. But experts like NYC stylist Erickson Arrunategui warn against ignoring professional advice, especially with split ends or color-treated hair. To effectively learn how to cut your hair, you need to know the techniques and how to keep your hair healthy, as advised by pros like Katelyn Ellsworth and Timothy Lehman.
As we dive deeper, remember, that we support your desire for self-care and independence. Our goal is to share expert advice for a successful DIY hair-trimming experience. Before you start cutting, let’s explore the best ways to trim your hair at home. Can you improve your haircare routine from your bathroom? Let’s discover it together.
Preparing to Trim Your Hair Like a Pro at Home
Starting to cut your hair at home means more than just cutting hair. It’s about careful planning for professional results. Experts in New York City, like Erickson Arrunategui, suggest checking if you need a haircut. Sometimes, a treatment can help you wait longer before cutting again. For more details, check out haircare essentials.
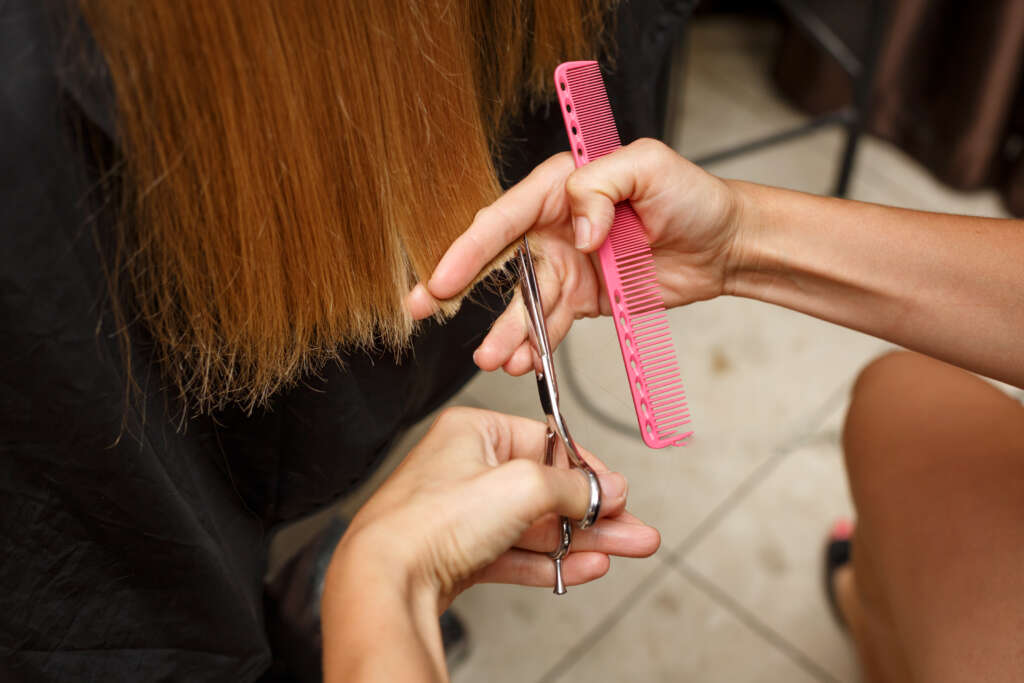
After deciding you need a trim, get the right tools for DIY haircut techniques. The right scissors, like salon-quality ones, are key for avoiding damage. Also, no-slip clips and a double-edged comb are must-haves for sectioning and keeping a neat line.
It’s important to think about your hair type when cutting. For curly or textured hair, cut while dry to see how it naturally falls. Using updated tutorials for sectioning helps you cut like a pro. For help with different hair types, including curly and kids’ hair, look for professional tutorials.
Experts suggest trimming from the bottom up. This keeps lengths even all over your head, just like salon stylists do. Having an experienced person help can also lower the risk of uneven cuts if you’re new to cutting hair at home.
In conclusion, DIY haircutting can be rewarding with the right preparation and tools. A step-by-step approach to handling hair sections is key. These tips can improve your cutting skills and give you better results at home.
Essential DIY Haircut Techniques: Tools You’ll Need
Learning to trim hair like a pro at home takes skill and the right tools. You need professional shears to get salon-quality results. These shears are made for cutting hair and keeping your hair healthy by preventing split ends.
Experts say using the right tools is key for DIY haircuts. The Rocky Mountain Barber Company Hair Comb is great for beginners. It’s anti-static and perfect for styling hair, beards, and mustaches.
For bigger cuts, professional-grade clippers are a must. The WAHL Magic Clip is versatile with different guard sizes for various lengths. The Wahl Professional Beret Lithium Ion Cord/Cordless Trimmer is also a top choice for precision and ease.
Keeping your tools clean is just as important as using them. Clean your clippers regularly and use clipper oil to make them last longer. Treat your professional shears the same way to keep them sharp and effective.

Products before and after cutting are also crucial. Using a special shampoo and conditioner, like Majestic Pure Tea Tree Shampoo and Conditioner, prepares your hair for a smoother cut.
Mastering DIY haircut techniques is about more than just using scissors or clippers. It’s about combining precision tools, maintenance, and proper hair care for a professional look. With practice and the right tools, trimming hair like a pro at home is achievable.
Trim Your Hair at Home: A Step-by-Step Guide
Many people are now learning to cut their hair at home. This is thanks to the rise in self-grooming, highlighted by Google’s “Year in Search” in 2020. This guide will teach you DIY haircut techniques and home hair trimming tips. You’ll learn how to cut your hair by yourself, from the comfort of your home.
First, you need the right tools. Choose quality shears for precision, not kitchen scissors. Also, get a cutting comb with wide and fine teeth for better control.
Begin by washing and drying your hair. This removes residue and shows its natural fall and length. Use the comb to untangle any knots. Then, divide your hair into sections with clips. This makes cutting even and achieving layers easier.
Start cutting at the lower back. Use your comb to lift a small section of hair. Make sure the hair is between your fingers at the length you want. For beginners, a straightforward trim of about an inch using a straight cut is advisable.
Move around the head, cutting each section the same length and layering. Professionals use point cutting for a feathered look or slide cutting for subtle layers and movement around the face.
Finish by checking for uneven spots and adjusting as needed. Clean your tools before and after cutting to keep them hygienic and efficient. A bit of texturizing spray or Virtue Split End Serum can make your haircut look and feel better.
This guide helps you save salon visits and learn basic hair styling and maintenance. It lets you take control of your personal style safely and successfully.
DIY Hair Trimming Tips for Straight Hair Styles
Learning how to cut your hair, especially for a blunt shape cut on straight hair, is key. It’s all about precision to highlight the sleek look of straight hair. Making sure the cut is even is vital to prevent uneven lengths.
For straight hair, every cut is visible, so a systematic approach is a must. Start cutting when your hair is damp for easier handling. Divide your hair into four sections with even ponytails at the base. This keeps control over each section and ensures a straight cut at the bottom.
When trimming straight hair, always use sharp hairdressing shears. Dull blades lead to a rough cut and can cause hair to split ends. Cut at a slight angle to achieve the look you want, whether rounded or straight.
One way to get a blunt shape is to bring all your hair to the front and cut straight at chin level. This method lets you see the length. It’s important to keep the tension even in both hands for balanced lengths.
After cutting, check your hair by letting it fall naturally. Look for any uneven parts. Use your fingers to adjust these areas for a better look. This fine-tuning not only fixes any issues but also enhances the blunt style, making it look professional.
Remember, while cutting your hair at home is convenient, practice is key for a perfect blunt shape cut.
Techniques for Cutting Long Layers and Maintaining Curls
Learning to cut long layers at home and keep curly hair looking great is empowering. It starts with knowing how different hair types work and the best ways to care for them. If you want to trim curly hair, focus on making the curls look their best and keeping them healthy.
Start by dividing your hair into three parts: one in front and two in back. This makes cutting easier and helps you control the length and shape of the layers. When cutting curls, cut less than half an inch off each end to keep the bounce and prevent frizz.
To make long layers, use your fingers to guide the scissors. This method creates a balanced look, with shorter hair in the front and longer in the back. Cutting regularly with sharp shears is key to avoiding split ends and getting a clean cut. Aim to cut 1 to 3 inches off to keep the layers healthy, especially if your hair is chemically treated or styled often.
Trimming curly hair every 3 to 6 months can make it look better and keep each curl defined and lively.
When trimming curly hair, try cutting curl by curl or the twist method to spot and cut split ends without cutting too much hair. Layering curly hair should respect its natural pattern. This approach means washing and styling less often, letting the curls set naturally.
Having a second person, like a friend, check the back sections is a good idea. This helps make sure everything is even and balanced. It’s a smart way to avoid salon visits and keep your hair looking great at home.
In conclusion, whether you’re cutting long layers at home or trim curly hair, the main thing is to use the right tools and methods. By following these tips, you can keep your hair looking amazing without going to the salon all the time.
Successfully Trimming Split Ends Without A Salon Visit
Split ends are a common hair problem that often leads to unplanned salon trips. But, learning how to trim split ends at home can save you time and money. It keeps your hair healthy and makes salon visits less frequent. This method also makes your hair look better.
Start by picking the right tools. You’ll need a sharp pair of hair shears, which are usually under $20. Dull scissors can make things worse, so a good pair is key. After washing and drying your hair, use a wide-tooth comb to detangle it. This makes trimming easier.
“Aiming for precision and gentle handling will ensure each strand maintains its integrity.”
For trimming, take a small section of hair at a time. Twist it tightly in both directions to show the split ends. Then, cut about 0.5 centimeters off each split end, making sure to cut straight across.
Do this for all your hair, using hair ties or clips to keep the sections separate. If you have thick hair, take smaller sections for better control. Remember, keeping your hair moisturized is also important. Use conditioners and deep treatments weekly to prevent new split ends.
If your hair gets tangled easily, use a quality serum before trimming. This helps prevent breakage and keeps your hair smooth.
By following these steps, you can extend the time between salon visits and keep your hair healthy. Trimming split ends at home is easy with patience, the right tools, and care.
DIY Haircut Techniques: The Ponytail Method for Layers
The ponytail method for layers is a simple way to add volume to your hair. It’s great for those who can’t afford salon visits or have thinning hair. This method lets you style your hair easily and keep it looking good for years.
Before you start, you’ll need 2 hair ties, a brush or comb, and sharp hair scissors. You might also want thinning shears. Cutting about ¼ to ½ inch off is recommended for clear layers. Regular trims and using thinning shears help keep your hair healthy.
Creating bangs should be done by a pro. But you can learn to fix split ends yourself. This keeps your hair looking good without cutting too much length.
It’s important to know how to cut your hair at the right angle for layers. Cutting small, gradual sections at the front helps keep things even. Cutting wet hair can change its length when it dries, so be aware of this.
Salon haircuts are getting pricier, often over $100 for a simple trim. The ponytail method is a budget-friendly option, taking just about 5 minutes. But, using low-quality shears can lead to split ends. So, invest in good tools to keep your hair healthy and stylish.